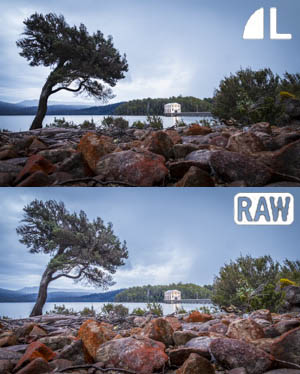
5) Shoot in RAW!
Of course you can get amazing, perfectly high-quality photos shooting JPEG (which you can edit to some extent later too) - and there are certainly valid arguments against shooting RAW in many cases and for many people - but there's no denying that if you do shoot RAW, you can squeeze out a lot more hidden detail from your images. You don't need to learn how to master Photoshop or anything like that to take advantage of post-processing either - it's becoming more and more common for even basic image viewing programs to allow users to adjust things. There's obviously a great deal more to post processing than just lifting out the details that otherwise seem lost in the black shadows of your photo and pulling back some detail from the bright highlight areas like the clouds - but even just sliding these two simple editing sliders a little can do wonders to your images, gaining you almost HDR-like contrast range, with the added benefit of being able to do it to moving subjects as well, as it's just the one single photo rather than the combination of a set of various exposures.
Tip A) To properly understand some of the important
differences between RAW and JPG, take a read of my comprehensive tutorial on
RAW vs JPG, complete with examples and direct comparisons.
Tip B) Another useful adjustment to experiment with for RAW files is upping the vibrancy or saturation a little, but be warned, don't over do it - 'over-cooking' your images is perhaps the most common way photographers ruin what could otherwise be a great photo, particularly in the eyes of competition judges or magazine editors. Don't feel bad about adding a little saturation etc to your RAW files though, as that's exactly what the camera does when it creates a JPEG for you.