 |
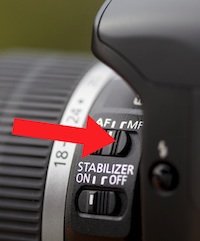
| Lock Focus with MF |
CHOOSE YOUR CAMERA SETTINGS
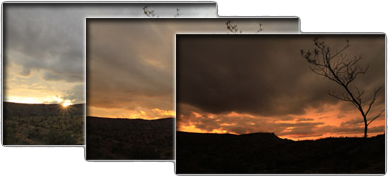
The scene and the subject should ultimately determine which settings you use for your camera. However, I've included some essential non-negotiables below, as well as a few basic tips on selecting settings. The goal is to blend together a series of similar still frames into a movie, with the only change frame to frame being the movement of your subject or the gradual evolution of light. It's therefore absolutely essential that your camera settings remain the same throughout the entire shoot, not suddenly glitching to a brighter camera setting etc.
The drive mode doesn't matter much as your remote timer will tell the camera to take one photo at a time at your desired interval. You may as well leave this on 'Single-shooting'.
Set your camera to shoot JPEG images, rather than RAW files, for ease of post processing in video software and for smaller file sizes - remember you'll be taking possibly hundreds of photos.
Lock your lens focus by selecting manual focus. This will prevent your camera from continually searching for a new focus point each image it takes and therefore ensures each image is identical. The best way to do this is to start with your camera on Auto Focus (AF) then half press the shutter button to autofocus on something about 1/3 of the way into the shot (as this will maximise your depth of field). Once your camera finds focus, you can release your finger and flick the AF/MF switch on your lens to MF. Providing you don't twist the focus ring, the lens will now stay locked at that focus.
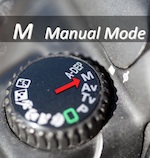 |
| Use Manual Mode |
Shooting in Manual (M) Mode. Generally speaking, Manual mode is reserved for occasions such as this, when you (the photographer) want 100% control over how the photo is taken and don't want any help from the light-meter to set exposure etc. As mentioned above, in time-lapse photography you want your camera's settings to be stable and consistent, even as available light gradually changes. This ensures the movie created at the end appears smooth and consistent. Without taking this approach, part way through your sequence, the camera may dramatically change its calculated settings to cope with changing light and the resulting time-lapse will have a sudden shift in brightness and look glitchy. For this reason other shooting modes such as Aperture mode (Av or A) or Shutter mode (Tv or S) are not suitable. Keeping the settings stable in Manual mode allows the viewer to see interesting patterns emerging in the resulting video, such as the brightening of the scene as the moon emerges, or subtle darkness which falls as a cloud drifts across the sun. The only downside to locking your settings like this is that it may not be able to cope if the scene brightness changes too dramatically (ie from bright daylight to full-on night-time) - you'd find that the ends of the sequence become too over or under-exposed. More on this later.
To get to Manual mode, turn the mode dial on the top of your camera to 'M'. You (the photographer) will now need to select the aperture (f-stop) value, the shutter speed and the ISO all by yourself. The good news is that the camera can help you select the right settings! Read on...
How do I know which settings to choose? The amount and type of available light will ultimately determine your choice of settings. The settings required to correctly expose a night scene, for example, will differ dramatically from a midday scene.
The easiest way to select your manual settings is to take some test shots using your camera in Aperture mode (Av). Point at the scene using a high f-value, somewhere over f/16 (see below) if shooting a wide scene. Have your ISO relatively low, somewhere around 400 (see below) and take a quick note of the shutter speed settings subsequently calculated by the camera. You can try adjusting your exposure compensation to 'over expose' and 'under expose' the scene to your liking, making a quick note of the final settings you're happy with. This will give you a great starting point for selecting your own manual settings.
Larger f-number (for large depth of field). More often than not, a time-lapse is of a large, wide 'landscape' scene. A large depth of field (making everything is in focus) is usually desirable when shooting such a scene. In order to achieve a large depth of field, a large f-number (aperture value) is required. A value above f16 on a wide-angle lens generally means the majority of scene will be in focus. The added bonus of a larger f-number is that point-lights, such as the sun or street lights, will often turn out with a 'starburst' effect, which can be pleasing to the eye.
Lower ISO (for better image quality). The higher the ISO value, the more 'noise' or graininess the image will contain. Try and minimise this if possible. Since you're shooting on a tripod, your shutter speed can be a little slower than if you were attempting to hand-hold the shot so there usually isn't a great need to use high ISO values when shooting a time-lapse. Aim for something around ISO400 or lower ideally.
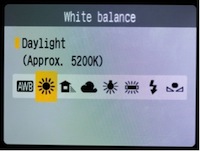 |
| Lock in White Balance |
Set your white balance: Using automatic White Balance is convenient for most shooting occasions. However, as discussed previously, when shooting a time-lapse we want each frame to be absolutely consistent and each photo to have exactly the same look and feel. Therefore you will want to nail down a single, consistent White Balance setting which is appropriate to the scene, so that the Whit Balance doesn't change by itself part way through. Have a little play around with some sample shots first, using different White Balance settings, and choose one you like. Generally speaking 'sunlight' works well for daytime scenes, or if shooting a sunset/sunrise, selecting 'cloudy' or 'shade' makes the image extra warm / red which can be pleasing.
Shutter Speed: You don't want your shutter speed to be too slow (unless you're going for a smooth blurry movement effect perhaps), but as mentioned you can get away with a bit slower than normal because you're shooting on a tripod and movement blur (when you join all your images together in a movie) will be far less noticeable than when viewing each individual still photo as a stand alone.
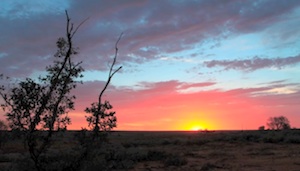
What if the scene is going to change? If you're shooting a sunrise or sunset the available light will change dramatically in a short time, meaning you will only get 'correct' exposure for part of your time-lapse sequence. That's totally acceptable as everyone knows sunset gets darker over time and the viewer will be expecting it. It actually creates great effects and draws the viewer in, as if they were standing watching the sunset right beside you. The trick is to try and anticipate 'correct' exposure when the sunset is at its most colourful. Simply by trial and error I've worked out that if I start to shoot a sunset time-lapse using the settings [ISO400, f/20, 1/25] more often than not 'correct' exposure for the scene will coincide with the sun being at its lowest. Getting this exactly right is partly luck, but if you're super keen to get it exactly right, go out the evening before, point your camera at the sunset and make note of which settings it calculates for you. Write these down ready for setting your manual mode the following evening. Of course the minutes prior to this time of day, when the sun is higher and brighter, will probably give you slightly over exposed photos. Don't be put off by this, what you're trying to capture is the obvious change in light and colour in the sky over time. If you used anything other than Manual mode, the camera would automatically shift settings every so often as the scene darkened to try and always bump the photo up to 'correct exposure' / 'mid-brightness', which isn't natural and creates these sudden brightness changes in the final video.